Schools want to be as helpful as possible during the admissions process in order to drive leads towards enrollment – and a great way to do so is by offering prospects plenty of useful resources. In Mautic, you can upload various resources, such as brochures or course price lists, to include as email assets within your messages.
Add a New Asset
Start by navigating to the Components menu and clicking Assets.

There, you’ll be able to see all your assets, as well as upload a new one by clicking “+New.”

Then you can drag and drop your file, or upload it manually.

Adding Asset Details
When you upload a file, by default, the title will automatically be the file name – but you can change that in the title section. You can also add a description to your file, determine where you want your file to be stored, and create an alias for your file.

Once you’re done, you can click “Apply” or “Save and Close” and your file will be added to Mautic.

Preview and Monitor Your Asset
Once you save your asset, you’ll automatically be brought to a page where you can preview your asset, as well as monitor downloads. You can also find this page by clicking the file in the Asset section of Mautic. If at any point you want to make changes to your asset, you can do so by clicking Edit.

Add Assets to Your Emails

There are many different ways you can incorporate resources into your emails with Mautic’s asset feature. You can add assets through a file attachment or embed code both for individual emails to contacts, as well as segment or template emails.
Attach Assets to Individual Emails
If you want to add an asset to an email you’re sending one of your student leads, first visit their profile in Mautic and click Send email.

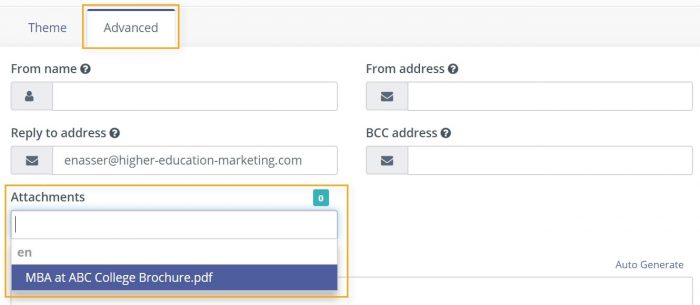
You can add an asset to your custom email through the “Attachments” field. It will automatically show your most recent assets when you click on it, but you can also search for a specific file name.

Alternatively, you can copy and paste your asset into your email body. To do so, you’ll first need the download URL. You can find it by navigating to the Asset menu and clicking your file. There, you can copy the download URL to use in your email.

Then, simply press the hyperlink button and paste the download URL. That way, the contact can click the linked text and access the asset.

Add Asset to Segment & Template Emails
You can add an asset to your segment emails by clicking the drop down menu next to your desired mail and selecting “Edit.”

Then you can either add your asset as an attachment, or embed it within the email.
Add Asset as Attachment
If you choose to go the attachment route, first click “Advanced.” You will be able to select your asset in the “Attachments” field.

Embed Asset in Email
If you want to incorporate your asset in the body of your email, first click on the email builder

Next, select what element you want to link. In this case, we’ve selected a call to action (CTA). Then click the hyperlink button in the “Customize Slot” section and paste your download URL


Once you click “Insert,” your asset will be added to your email.

